Monday, March 24, 2014


Tidbits and Tweaks


When we decided to start this blog we discussed what we would call it.  We decided on “Tidbits and Tweaks” because that is what we wanted to share—little tidbits we had picked up along the way and tweaks on our favorite recipes, crafts, etc.

I had given up long ago on making drop cookies or cookies you spoon onto a cookie sheet.  As a busy mother of four active children I didn't have the time, energy or patience for them.  My preference was bar cookies.  You made the batter, put it in the pan, baked it and you were done.  You might say I was the queen of bar cookies.  Then Beth started bringing her Triple Chip cookies to family gatherings.  The first time they showed up with semi-sweet, milk chocolate, and white chocolate chips.  Next time they had semi-sweet, milk chocolate, and mint chocolate chips.  They were so good I had to get the recipe.  Here it is:

Beth’s Triple Chip Cookies

3 cups flour                                                              1 teaspoon soda
1 teaspoon salt                                                        1 cup sugar
1 cup brown sugar, packed                                    2/3 cup shortening
2/3 cup butter, softened (=11 tablespoons)         2 eggs
2 teaspoons vanilla                                                 ½ bag white chocolate chips
½ bag semi-sweet chocolate chips                      
½ bag milk chocolate chips


Preheat oven to 375 degrees.  Mix flour, soda and salt.  Cream together sugars, butter, shortening, eggs and vanilla.  Stir in dry ingredients until well blended.  Stir in chocolate chips.  For a softer cookie stir (stir by hand) ½ cup flour.  Form into balls about 1 ½ inches in diameter.  Bake 8-10 minutes.  (Beth cooks them for 8 ½ minutes.)  Cool 2 minutes before removing from the cookie sheet to the cooling rack.  You can freeze the dough.  If baking frozen dough bake for 10-12 minutes.   (Beth bakes hers on parchment paper.)


Here is a tidbit for you.  I have found through the years if you give ten women the same recipe it will come back slightly different in ten ways.  If you want a recipe to turnout more like when you originally ate it you need to ask the original baker, cook, chief the tricks or secrets that they do.  If you look at Beth’s recipe her tidbits or tricks are written in parenthesis.

Well, I tried this recipe and fell in love with it!!!  I loved it so much I started experimenting with the “triple chips”.  Here are some of my “tweaks”:

Instead of using white chocolate chips I have used peanut butter, butterscotch, or mint chocolate chips. Delicious!

The ones I wouldn't use again have higher sugar content and melt to the cookie sheet making it miserable to get off the sheets.  Two examples of this were Heath baking bits and caramel (yes that’s right—caramel) baking chips.

Then I started experimenting with candy.  I found mini Rolos didn't work well because once again the caramel would melt and stick to the sheet. In the process I came up with a recipe for what we call “Almond Joy” cookies.  Here is the recipe:

Almond Joy Cookies

3 cups flour                                                  
1 teaspoon soda
1 teaspoon salt                                            
1 cup sugar
1 cup brown sugar, packed                      
 2/3 cup shortening
2/3 cup butter, softened (=11 tablespoons)         
1 teaspoon vanilla                                       2 eggs
1 teaspoon almond extract                         ½ cup coconut 
1 heaping cup Almond Joy pieces            ½ cup diced almonds            
1 cup milk chocolate chips
                                                         
Preheat oven to 375 degrees.  Mix flour, soda and salt.  Cream together sugars, butter, shortening, eggs and extracts.  Stir in dry ingredients until well blended.  Stir in chocolate chips, Almond Joy pieces (I measure a cup of the Almond Joy pieces and a cup of the milk chocolate chips.  Then I put the rest of the Almond Joy pieces in a cup measuring cup and top it off with milk chocolate chips), coconut and almonds.  For a softer cookie stir (stir by hand) ½ cup flour.  Form into balls about 1 ½ inches in diameter.  Bake 8-10 minutes.  (I cook them for 8 ½ minutes.)  Cool 2 minutes before removing from the cookie sheet to the cooling rack.  You can freeze the dough.  If baking frozen dough bake for 10-12 minutes.


In my experimenting with candy I came up with this version as well:


Reese’s Peanut Butter Cup Cookies


3 cups flour                                      
1 teaspoon soda
1 teaspoon salt                               
1 cup sugar
1 cup brown sugar, packed           
2/3 cup shortening
2/3 cup butter, softened (=11 tablespoons)        
½ cup peanut butter                         2 eggs 
2 teaspoons vanilla                          ½ cup cocoa                   
milk chocolate chips
1 cup Reese's Peanut Butter Chips  
1 heaping cup of Reese's Minis Unwrapped Peanut Butter Cups
      
Preheat oven to 375 degrees.  Mix flour, soda and salt.  (I use 2 ½ cups of flour and ½ cup of cocoa.  I find if I mix the cocoa in now it is distributed more evenly.)  Cream together sugars, butter, shortening, peanut butter, eggs and vanilla.  Stir in dry ingredients until well blended.  Stir in chocolate chips, Reese’s Minis Unwrapped Peanut Butter Cups, and Reese’s Peanut Butter chips. (I measure a heaping cup of Reese’s minis, a cup of Reese’s peanut butter chips, for the third cup I use the rest of the minis combined with the rest of the peanut butter chips.  If the third cup isn’t full add milk chocolate chips to top it off.) For a softer cookie stir (stir by hand) ½ cup flour.  Form into balls about 1 ½ inches in diameter.  Bake 8-10 minutes.  (I cook them for 8 ½ minutes.)  Cool 2 minutes before removing from the cookie sheet to the cooling rack.  You can freeze the dough.  If baking frozen dough bake for 10-12 minutes. (This tends to make a denser cookie because of the added peanut butter.) 

Now it’s your turn.  Have fun and see what kind of combinations you can come up with.

Monday, February 10, 2014

Family Olympic Ceremonies


I don’t know about you, but we love the Olympics at our house. We decided that in honor of the 2014 Winter Olympics we would have our own family opening ceremonies.


I made all of the signs with just some scratch paper and Tay’s crayons. This is what our schedule for the evening looked like.


We started off by feeding the athletes (aka our family) an international dinner (I got this idea from A and Steph). Here is what our menu looked like.


After dinner we ran the torch (a flashlight that I taped tissue paper and foil to). We started in “Greece” of course.


We each took turns running the torch around our house. We had the lights on downstairs to represent running the torch during the day, and turned off the lights upstairs to represent running the torch at night. We cheered as whoever was holding the torch ran by. Our dining room table was our track so we ran the torch around the track and then lit the big torch (our gas fireplace).

After we ran the torch we each made a flag to represent our own country. We used scrap paper and taped it to straws. Then we, the athletes, marched into the stadium (down the hall and around our table).


It was a fun night and a few days later our daughter is still carrying her flag around with pride.

Happy Olympics!

Heather

Wednesday, December 11, 2013

Dating when you are married

One of the major pieces of advice we got when we got married (from multiple people) was to make sure you still find time to date. I realize after four years of marriage and huge changes in our life how hard this is!!

Luckily my husband and I decided early on that we would try to go on a weekly date. Some weeks are better than others. Our dates have greatly changed through our marriage. When we were first married we were both in school. Funds were limited and the weekend was really the only time we saw each other. We had to get very creative with our dates. We actually started a blog (Dating Blog) after someone suggested that we put our ideas down somewhere.

After we both graduated we had a brief moment, when I was pregnant with our first child, that we felt like we could actually do traditional dinner and movie dates.

After having one child and another one on the way we have found that babysitters aren't always easy to find. Once again we had to get creative. Now on Friday nights after our daughter is in bed we have an at home date. We try to make it different than the other nights of the week. We take turns with planning the dates. We have now started posting our ideas on the blog that we started when we were first married.

I guess the point of this blog is to encourage you to keep dating :) I know it's hard, but I think the effort even makes a difference. If you want ideas you can check out the links above. I have to warn you some of the ideas seem juvenile. Luckily I have a husband who is a big kid at heart and goes along with my ideas :) I have tried to cater to his interests too, like doing a Harry Potter date and a golfing date.

Happy dating!

Heather

Christmas Lights

I know this is a busy time of year! We actually had a free night and wanted to do something fun and festive. We decided to drive around and see the lights. Fun and inexpensive (what we like)! I found this Christmas light scavenger hunt here:

Christmas Light Scavenger Hunt

It gave us something to look for. We even added a little bit to it. Whenever we found one of the items on the list we would get a treat. In our case a few M&Ms. We didn't find everything in one night, but now when we are in the car going somewhere we look for those last items we didn't find. This would be fun for a mutual activity or date night too :)

Thursday, November 21, 2013

The Tooth Fairy Cometh!

 
 When our oldest son lost his first two teeth about a year ago it was time to decide how the Tooth Fairy would exist at our house. I remember talking to some of my friends about what they did and I couldn't believe how much money "she" paid some tooth-loosing children! Not only did "she" pay them for their teeth but sometimes she brought video games or other glamorous things!? I was shocked! Well, I quickly decided that our Tooth Fairy was not rich and that "she" would stick to a fairly traditional routine at our house. This is what we do:

When a tooth is lost it is placed under the child's pillow before he/she goes to bed. While they are sleeping she works her magic!

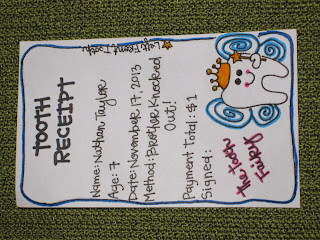
She, of course, takes the tooth and leaves $1 for each tooth lost and a Tooth Receipt.


The Tooth Receipt states the name of the child, how old the child is, when the tooth was lost, how the tooth came out, how much the child is paid, what tooth it is, and, of course, is signed by the Tooth Fairy.

The Tooth Fairy also leaves a trail of sparkles/fairy dust!

 
I like to sprinkle a little under the pillow, on the corner of the bed and on the floor.

It has been absolutely hilarious to see how delighted our son has been with this! Of course all he really wants is the money, but he loves the receipts and seems to be a little miffed with the mess of sparkles that is left behind!

(*I cannot take full credit for this idea. I did hop onto the Internet and googled "Tooth Fairy". A picture of this tooth receipt came up and I made my own handmade version. It's been so long that I cannot remember the exact source but thank you to whoever created it; it's been fabulous!)

Sorry about my pictures being sideways! I'll try not to do it again! : )

Pumpkin Chocolate Chip Pancakes

Last month I ran across a recipe for Pumpkin Pancakes in the October issue of our church's magazine, The Friend. I'm pretty sure the dialogue in my head went something like this, "Mmm, pumpkin pancakes; I bet those are tasty! I love pumpkin! BUT will my kids eat them? Pumpkin is good for you, right!? It must have some sort of vitamins and/or antioxidants. This is the perfect way to get some veggies into their diet without them knowing it! I'll just have to make sure and tell Dad not to mention anything about them being pumpkin pancakes...they're just pancakes, and we all LOVE pancakes!"

So, with my sneaky plan in order I mixed up a batch.

Pumpkin Pancakes:

2 cups dry pancake mix
1 1/2 cups water
3/4 cup canned pumpkin
1/2 teaspoon cinnamon

1. Spray a frying pan with nonstick cooking spray. Preheat it on the stove on medium.
2. Combine the pancake mix and water in a large bowl. Add pumpkin and cinnamon and stir well. If the batter is too thick, add a little water. If the batter is too thin, add a little pancake mix.
3. Pour a scoop (about 1/4 cup) of batter into the hot frying pan.


When the pancake bubbles on top, it's time to flip it over.

 
Cook until both sides are golden brown.
4. Serve with bananas, applesauce, or another favorite topping, and enjoy!
 
Tip: If you don't have dry pancake mix, you can make your own! Stir together these ingredients in place of the pancake mix in the recipe:
 
1 1/2 cups flour
1/4 cup powdered milk
2 tablespoons sugar
2 teaspoons baking powder
1/2 teaspoon baking soda
1/2 teaspoon salt
 
Of course this is my personal opinion...they were just okay. My boys didn't seem to fond of them and our little girl liked them the most. I thought they tasted like raw, plain pumpkin.
 
I didn't give up though, I had to make these work. So, I thought about it and came up with Pumpkin Chocolate Chip Pancakes. I mixed up a batch yesterday and they were a hit!
 
Just follow the recipe above but with these changes:
 
When mixing up the batter, instead of 1/2 teaspoon of cinnamon add 1/2 teaspoon of Pumpkin Pie Spice.
 
Also add 1/2 cup mini chocolate chips. I like to put these in a small bowl and mix them with a little bit of flour. This helps them to stay "floating" in the batter rather than sinking to the bottom of the bowl.
 
I also like to re-stir the batter before I put a new batch of pancakes into the pan, just to make sure that the chocolate chips are evenly distributed.
 
Here they are: (even though the picture is sideways)
 
 
The kids did find out that there is pumpkin in the pancakes, but it doesn't matter because they snarfed them down! I only have two left and they're hiding in the fridge so I can have them! : )
 
Just think of all the possibilities for these babies! My kids ate them with maple syrup and loved them. I ate them with some killer homemade butterscotch syrup that my friend gave to me. BUT you could also serve them with buttermilk syrup...what about warm with a scoop of vanilla or cinnamon ice cream...you could also do a stack of three with whipped cream between each layer...you could do chocolate sauce...what about sugared or caramelized pecans...oh, the possibilities!
 
Maybe this year you can have a Thanksgiving pancake feast for breakfast!
 
What do you do with this leftover canned pumpkin? I measured mine out in 3/4 cup increments and put them in little freezer bags and threw them in the freezer. That way the next time I want to mix up a batch, I can just thaw the portion that I need!

A Lesson in Gratitude

Since the Great Turkey Day is upon us, I thought that I would share a fun idea that we did with our kids for Family Home Evening the beginning of this month.

Often when we think of Thanksgiving thoughts go right to the fabulous feast that we often partake of and its delicious components - turkey, mashed potatoes, rolls, pie...Mmmmm! But more importantly we should be thinking of those things that we have been blessed with that we are thankful for. There are so many around us and far away that are not blessed with the great prosperity and abundance of things that we are in this great country, so I figured it would be a good idea to remind ourselves of what we have and how grateful we should be. Thus, the Gratitude Chain was born.

I took sheets of construction paper - red, orange, yellow and brown - and cut it into fairly thin strips.

We then sat down at the kitchen table and had a small discussion about Thanksgiving and what it means and why we celebrate it. I explained that we were going to write things that we are thankful for on each strip of paper and then make a chain and hang it up where we could see it, and daily be reminded of all of the things that we are thankful for.

I have to say that I was quite surprised with some of the things that our kids mentioned. As a disclaimer, we have two boys and a girl, ages 7 1/2, almost 5 and 19 months. As I expected we had a large number of silly things such as:
underpants, diapers - I am definitely grateful for those, no matter how silly it seems!, milk, and Christmas lights. But they also mentioned some very "grown up" answers such as:
the Gospel, the Holy Ghost and callings among other things that we are eternally grateful for.

Once we filled out all of the slips of paper we took each one and stapled the ends together, looping them through each other, creating a chain. We then hung it in the kitchen along the wall so we can see it throughout the day. All of our kids have often mentioned something about it while we're sitting and eating, or our little one  - who refuses to speak, whom I affectionately refer to as "Grunt"! - will stop and stare at it and point to it; I am convinced that she knows what it signifies.

What a wonderful lesson this turned out to be for me. Not only is it always a good thing to stop and reflect on all of the things that we have, but, I think, that I am even more grateful for the fact that my children recognize the things that are truly important.